Wednesday, February 29, 2012

Monday, Feb 27 - Concepts of Editing in FCP

It's post-Oscars Monday!  And let's hope this class is less disappointing than the bland awards show.  There's plenty to pick apart in terms of the Hollywood showcase, and it's a good lead in discussion to Wednesday's class.  For now, I'll share this with you:  The voting group that makes up 'The Academy' is comprised of over 70% men and less than 10% people of color.  The vast majority of them are over 50 years old, with most of those actually older than 60.  Ugh.


Moving on... Today we're going to continue our look at Final Cut Pro and dive in a bit more to look at editing concepts.  Last week we got as far as a simple layout of our simple seen - we managed to shoot and rough edit the piece in just one class which is great, but there's a few things we probably rushed and a few other things left to do.  Let's start by revisiting our cut and seeing where we can improve some of the edits:


Okay, so it mostly works as a sequence, but there's a number of things that really need to be improved.  The beginning shots probably linger a little long, some of the cuts feel a little abrupt, we have a continuity error in terms of her movement, and the sound is a sad mess.  Let's start by refining the cuts a little bit - now, we ran into an issue where one of our key shots doesn't quite match the action of the rest of the scene, so we either have to fake it with what we've got, see if we can change the shots a bit, or try to reshoot the scene.  Let's say we can't reshoot, so we have to fix it in the edit -- you guys can try that in a bit, but for now, let's try to mask it just with the help of sound.

While I'm at it, I'll go ahead and fill in sound for the entire scene.  For now I'll just rely on what's quickly available to me using Final Cut and Apple sound libraries as well as what we captured on set.  If this was an important project, I would go out in to the field and do some of my own recording too.  We'll also slow down our bottle-drop shot as you all suggested for dramatic effect and add some reverberating booms to the hits on the floor.

Notice how with just a few simple sound additions the piece starts to take on a whole new polish - it really enhances how full the scene really appears to be:


The final step would be to go in and make any final adjustments, especially with a focus on image and color.  I could throw a title on the beginning and credits on the end using the text tool - and boom, I've got a complete little sequence.

To add a title/text in Final Cut:


And that, my friends, represents what is essentially the basic workflow for post-production editing.  This was a little bit slap-dashed considering we shot it and laid down a rough edit in just about 2 hours, but you get the idea!  Let's review:

1). Start by importing and organizing/labeling your footage.  This is also your first opportunity of post-production to review your footage to determine good takes and moments, and to get a feel for how different things will cut together.

2). Once you've determined what clips you'd like to use, start marking your moments using IN and OUT points in the viewer window and laying the footage onto the timeline.

3). Build out your sequence.  As you go through you may make small adjustments.  Once you've made it through this process you have what is called your 'rough cut'.  You can now determine what you still need to address.

4). Start refining your cut by addressing problem spots, cutting out unnecessarily material, awkward cuts, working on transitions, etc.

5). Once you're happy with the general layout and pace, you can start to work more directly on sound.  Do several passes to smooth out sound, add sound, work with music, etc.

6). Once you're done with sound, you can go through and do a pass focusing on the image, boosting the quality or giving it the look you want as well as making sure colors and lighting generally match from shot to shot. *

*If your film requires special effects you will likely incorporate the effects footage to some extent throughout the post production process, but it will become most intense towards the end when the edit is more or less locked in.

Some important tools in the process of using Final Cut:

1).  Your arrow tool and your razor-blade tool.  You arrow tool is the default tool that you control with your mouse.  Use it to grab things, select things, move things, etc.  The razor blade tool becomes useful for when you want to trim a clip on the timeline - it acts like a slice in your footage to break a clip into sections.  You can select the tools from the tools window, or you can use your keyboard quick-keys:
a = arrow tool
b = blade tool


2). Cross-fades, volume adjustment, and other transitions.  To add a fade to either your image or your audio you just right-click and add a crossfade to the front of your clip or the intersection of two clips.  To manually adjust audio volume you simply turn on the clip overlays (in the bottom right corner of the timeline window) and then adjust the pink volume line that appears on your audio track:

3). Snapping and linking.  The snapping and linking tools are meant to help you efficiently manipulate the footage on the timeline.  When you turn snapping ON (upper right corner of the timeline), it makes the footage in the timeline act magnetized.  When two clips are placed close together they *snap* together.  This is great, except for when you're trying to carefully time an event out and you don't want the clips to jump together - then you would turn snapping OFF:


Linking allows you to control the video track and the audio tracks that are associated with that video.  If linking is ON, it will select both video and audio tracks.  If linking is OFF, you can isolate video or audio tracks:


More about quick-keys: Quick keys (sometimes called hot-keys, keystrokes, or keyboard shortcuts) are awesome.  For most every tool and task in a piece of software, especially professional software like Final Cut Pro, there is a keyboard shortcut that allows you to accomplish the same thing by simply pressing a key or combination of keys.  For example, instead of using the razor blade tool to place a slice in one of my clips, I can simply press "control" + "v" and it will make a slice wherever my playhead is placed:


You can learn the quick key combinations by looking at them in the menus where you are going to do the selected task, or by hovering your mouse over the tool.


The quick-key to render is "command" + "r"      and the quick-key to turn on/off snapping is simply "n"

But for a quick guide, here's a list of great and useful quick keys to use in Final Cut Pro:
By the end of class you all had some great edits of your own versions of our little scene!  Everyone really took off with Final Cut.  I was impressed by the variety of choices - some of you really were able to use the shot of Karina's eyes to make her much more of a character.  Others of you totally changed the tone of the scene by re-arranging just a few shots.  And at least one of you completely solved our continuity problem!!

Elisa's edit, where the embarrassment revolves around her speaking rather than just dropping the bottle:


Allou's edit - totally fixed our continuity error:


Wednesday, February 26th- Women's Media Literacy

Today we’ll be looking at Media Literacy from a woman’s perspective. As we begin to define what makes media positive or damaging, the students will view videos that use a variety of methods to address the issue of sexism.


*10 Cliches Framed in Comedy
 We’ll begin the discussion by showing a clip from Parks and Recreation, during which Amy Poehler’s character, Leslie Knope, takes the blame for shooting Ron Swanson. Although this clip is from a comedy show, Poehler’s character plays into a variety of very real clichés about women.


*The “Shared Experience” and Artistic Accountability
Let’s begin to think of media literacy as a filter that can be applied to the media you consume and create. Whether watching television, out at the movies, or reading a magazine we are constantly being bombarded by stereotypes of what women should be.

Author, feminist and social activist, Bell Hooks, describes movies as providing “a shared experience, a common starting point from which diverse audiences can dialogue about these charged issues.”

In her writings, Hooks brings up the idea of artistic accountability, meaning that artists are responsible for the views portrayed in their work. According to Hooks, “Thinking in a constructive way about accountability never diminishes artistic integrity or artistic vision, it strengthens and enhances it.”

*The Bechdel Test
The Bechdel Test is an uncomplicated test to determine if there’s gender bias in a film. Although it appeared in a 1985 comic strip, few Hollywood features pass this test. In the comic, one of the characters says she only watches movies if it satisfies the following requirements:

1. It has to have at least two women with names
2. Who talk to each other
3. About something other than a man

This video looks at the 2012 Oscar nominees and where they stand with the Bechdel test 
(screening from 01:06- 4:47)


Additionally, here’s a list of 10 Famous Films That Surprisingly Fail the Bechdel Test:


*War Zone
The film War Zone, by Maggie Hadleigh West, shows what it's like to be a woman on the street in a cultural environment that does little to discourage the heckling, following, touching or disparaging of women in public places.


As a class, discuss the students’ reaction to the film. Was her filmmaking method effective in showing a woman’s perspective? What shocked you? What creative choices did you like? What changes would you make (if any)?

*Beyond Beats and Rhymes
Director Byron Hurt created the documentary Hip Hop- Beyond Beats and Rhymes to look at the negative ideology portrayed in mainstream hip hop. Not only does the documentary look at how women are objectified, it also explores the complex idea of masculinity.


*The Future
(15:25)
 Filmmaker, author, and performance artist, Miranda July, takes a comedic approach to dealing with the influence of the media in her film, the Future. Sophie, a character played by Miranda July, decides to quite her unfulfilling job and follow her dream of being a dancer by releasing a video series called 30 Days, 30 Dances.


Afterward, discuss the class reaction to the clip. Has Miranda July incorporated the pressures of society into her film? Does it seem realistic?

Shut Up and Sing
(38:07)
Barbara Kopple and Cecilia Peck’s documentary, Shut Up and Sing, looks at the Dixie Chicks’ career following an anti-George W. Bush statement at a 2003 concert. Both the subjects and filmmakers in this documentary faced creative choices regarding the portrayal of women.


The Dixie Chicks were propositioned by a number of documentary filmmakers, including Michael Moore, but decided to have female filmmakers Kopple and Peck share their story. Rather than having a narrator or text explain the events in the movie, the filmmakers decided to let the women speak for themselves.

After watching the clip, discuss class reactions. What choices did the filmmakers make? What emotions did that evoke? Do you think the Dixie Chicks would have received a different media reaction if they were the Dixie Dudes?

Additional Sources of Inspiration:

-Here's a blog dedicated entirely to bashing sexist advertisements:
http://sexistads.tumblr.com/


-This is an editorial photo shoot that had a skinny model and a “plus size” model pose in the same clothing:


- Here's a fascinating TED talk led by author Chimamanda Adichie. She tells several stories that explain the danger in telling only one side of a person or community's story:


Wednesday, February 22, 2012

Wednesday, Feb 22 - Group shoot and sound edit

At the end of last week we did a breakdown of this simple script so that we could shoot it, in particular we had an emphasis on sound design and sound effects.  Today, we'll shoot the scene.

First, let's review what we came up with, here is the script:

If you recall from last class, we did a bit of a breakdown within our screenwriting software, Celtx (available for free - download at www.celtx.com).  That's why some of the words above appear in various colors.  Each color represents a different department (Classroom in yellow = location, Students and Student 1 in red = casting - extras and primary, etc.)  To do this you go to the 'breakdown' tab in Celtx and highlight your need, then add it to the appropriate department.  Celtx keeps track of what you need for each scene:


This is a great way to start keeping track of needs.  We also created a shot-list as a group.  I wrote it on our little whiteboard with my pretty terrible handwriting.  It looked like this:

Now, that's essentially what we need to begin our shoot, but it's always a good idea to organize this information for maximum efficiency.  Let's start by cleaning up that shot-list:

Something easy to read, easy to share, and easy to edit is always a good idea for something like a shot-list, so I recommend making them as electronic documents.  As we can see, we have 13 shots planned, that's plenty of coverage for such a short scene, but it's not uncommon to have so many shots.  Remember, if it isn't perfect the first time (and it rarely is), we'll have to do multiple takes of many of these.  This is why shooting movies takes such a long time and the workdays can last 12-16 hours.  
Notice that shots are only listed once, even though when we edit them the same shot will appear during different moments in the scene (Medium Close Up on Student 1, for example).

The cinematographer and camera department often also utilize storyboards and floor plans, so they're even more prepped for each scene.

Storyboard example:
A storyboard gives a sense of what the action will look like from the perspective of the camera once the sequence has been edited.  You'll notice various shot lengths, actions, and moves are all part of the plan.

Floor plan examples:


The floor plans give a birds eye view of the scene and emphasize the layout of set pieces, lighting, actors' blocking (movement), and the camera positioning and movement.

Another thing you might come across or use during a production is a more organized breakdown, and something called a call-sheet.  The breakdown in Celtx is nice, but the information is kind of buried, so usually someone will extract all of that information for each scene and use it to compile a schedule that also keeps track of all of the various on-set needs.  This includes props, actors, equipment, etc.

Here's a really solid example of a breakdown/schedule for a short student film:


Once the appropriate departments determine the shooting schedule, a call-sheet is distributed to cast and crew to let them know when they need to arrive and what needs to be prepared for each scene.  A call sheet looks something like this:


Different cast members and scenes have all been assigned numbers at this point, so they just show up when their number appears on the schedule.  Call sheets have a variety of different looks, but this gives you a general idea.  These are more essential for large shoots where the cast and crew become a lot to keep track of.  We don't particularly need one for today's exercise.

All of these things help in the preparation of an efficient, fun shoot.  Some productions utilize all of these tools, others pick and choose based on what the director and crew prefer.  For today's shoot, our floor plan is more or less mapped out and dictated by our classroom setting - we can add some camera choices to a floor plan or we can just decide each specific set up based on our shot-list and natural sense.  Let's get started.

This is also our first chance to take a look at Final Cut Pro (FCP).  Apple has just recently released an update to this highly popular professional software known as Final Cut X (FCX).  However, it hasn't been very embraced by the professional editing community because it was such a departure from other editing systems and didn't bring along a lot of the features people liked most.  So, until it's a more professional tool we'll be working with the last commonly used version (version 7).

When you open Final Cut, it looks something like this:
As you see, there are four main, separate windows, and two smaller windows.  Let's take a look at what each of these is for.  Currently in the top-left is the Browser window.  This is where your media files are organized.  Final cut can handle a variety of media.  Most of it is video - and Final Cut handles a lot of different video formats.  It also handles audio files, as well as image files such as JPEGS and Photoshop files.  When you import a file for use into Final Cut, it will place it into the browser window.


Various files in a final cut project appear in the browser.

From there you can organize your files further by renaming them, putting them into folders (called Bins) or color-coding them.  It's important to note, however, that when you use files in Final Cut you are only referencing them from where they exist on your computer/hard drive.  So any changes you make to a file inside of Final Cut won't actually change the file on your computer.  We'll talk about this more as we get further into Final Cut.

To bring footage into Final Cut from a camera, you have to use a tool called "Log and Capture..." (if it is a tape-based camera) or "Log and Transfer..." (if it is a file-based camera).  To do this, start by created a new project.  Go to File>New Project:

We'll have to make sure that our capture settings are correct by going to Final Cut Pro>Easy Set Up.  When you shoot your own projects, I can help you determine what settings to use depending on what type of format your camera shoots in.


We also have to choose a destination where we're going to save our work by going to Final Cut Pro>System Settings.  We'll talk about this more when you start doing your own projects.


Once we've set up our footage to save in the correct folder on our computer, and Final Cut knows what format to save it in, we're ready to capture our footage (our camera needs to be turned on, in playback mode, and connected via the proper cable)  To do this we go to "File>Log and Capture..." (or "Log and Transfer..." if you're using a file-based camera).


That opens the capture window.  Now we can control the camera from Final Cut look at our footage, and by clicking on Capture Now we'll start capturing the footage off of our tape.  Once we've captured the footage we want and close out of our capture process, the footage now appears in our BROWSER window as a file.

To look at a file, simply double click it in the browser.  You will see it appear in the VIEWER window:


One type of file that appears in the browser is what's called a sequence.  A sequence is where you actually build out your scenes, and eventually your entire movie - we'll come back to that.

Once you find a piece of footage that you like, you can then select a portion of it using IN and OUT markers.  Then you can add that clip to the TIMELINE which is the window on the bottom.  Once you add it, you'll notice that you can see a video track and any accompanying audio tracks.  To view and play back material in the timeline, simply use the spacebar or the play button in the CANVAS window, and watch the material in the CANVAS window.


You can then use your toolbar tools to do any number of things; Final Cut is a pretty powerful piece of software - you will eventually learn how to use the tools and other menus to adjust the image, monitor and manipulate audio, add effects and transitions, and all of the things beyond that will help you create a full piece.

All of that is for a later day - for now, just remember that the BROWSER window is to organize your footage, the VIEWER window is to look at and make changes to individual clips, the TIMELINE is where you build your sequence(s), and the CANVAS is where you monitor what's going on in your timeline sequence.  If you should need to access your sequence, just double click on the sequence file in your browser.  You can also work on individual sections of your movie at a time.  To do this, just create a sequence for each scene in a movie, and then copy and paste each of those into a larger, master sequence which is your whole movie.

For today's shoot, after we successfully shot our whole scene with all of the coverage we wanted, we captured the footage into Final Cut and then built out a simple sequence with all of the action edited the way we liked.  We then identified what sounds we wanted to add, and imported them from a sound library.  Some of them already existed in what we had recorded.  We then layered the tracks of sound with our edit, and this is what we came up with:

Here's what our timeline looked like in our Final Cut Pro sequence:

Wednesday, February 15, 2012

Wednesday, February 15th - Thinking about sound


We'll start today looking at your resumes and addressing any issues or questions you had from your cover letter/resume session.  If you haven't already provided your resume, please email it ASAP so that we can take a look and give you notes by next week!

Next, we'll take a look at your footage from Monday's scavenger hunt.  What worked well?  What was difficult?  How is your White Balance, Exposure, Focus?  What are the things you did or didn't like about trying different composition styles?

The one area we haven't looked at from our camera set-up best-practices (W.E.F.A.) is AUDIO.  Today, we'll begin looking at just that.

Let's look at a clip from a movie - the sound is pretty complex, but contains a lot of the elements you can expect to see in a film.

(We watched a clip from Mullhulland Drive)

Let's see if we can identify all of the various elements at work here.

Let's watch another (you've probably seen this):


Now check this out - look at how different things once sounded in a scene from the same movie, before any sound work was done:


This difference is due to the world of sound design.  Your sound needs are going to be different for every project, but this clip about the sound design and sound creation for Wall-E gives a nice overview of the concepts as well as a pretty good history:


If you're interested, here's another look from the live-action and CGI mash up movie Transformers.  A pretty terrible movie, but look how hard they worked on sound:


So, we've already identified that the basic sound design elements for a movie fall into these major categories:

- Voice/Dialogue

- Sound FX

- Background/Environment sound

- Music

Typically, the most critical thing to capture well during production is the voice or dialogue.  But for each project you need to identify what elements are going to be captured during production, and what sound elements will be added later.  Thinking about sound is of major importance to your project - in the same way that you need to think about your camera composition and movement and consider how the choices you make for each of those will dictate the emotion and clarity of your piece, sounds and music are just as provocative and important to the final product.

Let's discuss how each element ends up in the final product and what effect your choices have:
Dialogue:
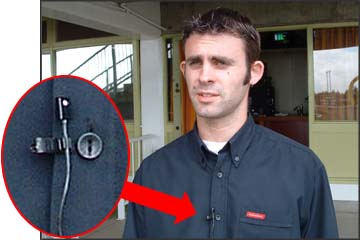
  • Location recording + Microphone choices – shotgun mics, boom operation, hidden mics, lavs, etc.
  • Automated Dialogue Replace (ADR) recording
Environment/Ambience:
  • Partially recorded on location – capturing room tones, additional location sound capture
  • Sound library resources
  • Capturing environment sound after the fact
  • Why it’s important to not record in crowded/loud environments, especially as it pertains to cutting scenes together (no music playing, people talking, etc)
Sound FX:
  • Some recorded on location, but not often used in the final edit
  • Recreated in post using Foley methods
  • Added in with Sound FX Library
Music:
  • Almost never recorded on location
  • Diagetic vs. Non Diagetic
  • Can be emotionally didactic/heavy handed
Let's look at some of the tools available to you for capturing sound:


  • Microphones:
    • Shotgun microphone and proper set up:


    • Lavalier microphone and proper set up:

    • Omni-directional microphones:


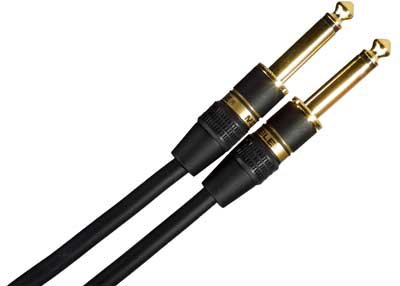
  • Audio cables:
    • XLR


    • ¼”


    • 1/8”

    • RCA
  • Using the microphones:
    • Using a microphone on a boom
    • The boom pole
    • Shock absorbtion
    • Proper booming technique
    • Wind muff/zepplins/etc.
  • Using a lavalier Mic
    • To hide or not to hide?
    • Best proximity from the subject
    • Avoiding ruffling noise
    • Working wirelessly (?)
  • Monitoring the sound:
    • In camera
    • External recorders/field mixers (?)
    • Syncing/Slate (?)
    • Headphones!!!!
Next, we looked at a basic one page script and broke it down - the emphasis was on sound, but we'll be filming this next week, so we need a full breakdown that includes a location, actors, shot list, props, and of course, SOUND.

Monday, February 13, 2012

Monday, February 13th - Camera Composition, Movement, and Style

We'll start off today by checking in and reviewing some of the concepts from last week's soft-skill workshop on resume and cover letter writing and etiquette.  These skills are hugely important, they're exactly what should be getting you work.  In the field of film/video production, there are a few additional tools you should think about as well.

When you're applying for a job, whether it be a full position at an organization or a single gig as a contractor, consider what role you're applying for.  For each role you're most interested in you should have a portfolio of work.  As an artist, this is going to be an incredibly helpful thing to start and keep updated.  In motion picture work, your portfolio is usually in the form of a demo reel.  A demo reel is an entertaining, fast-paced look at samples of the BEST of your work.  Here's an example:

This is a pretty good reel - it's entertaining, to the point, and not too long - all key features.  My only major criticism is that she failed to identify exactly what her role was for each clip - which means that we have to assume she did everything.  Maybe she did, but chances are she was either the animator, or the director, or another visual FX role - and if she DIDN'T do everything she can get in trouble for misrepresenting herself - or at least set herself up for an awkward moment in an interview.

Another really fantastic way to represent yourself is with a website.  This gives you the opportunity to showcase not only your reel, but any additional pieces you have in their entirety - along with other types of work you may have (like photography).  The website will also give you an opportunity to create an entire aesthetic to present your work, which can set you apart.

Take a moment and look for a job or internship online - something you either think that you'd actually like to have, or a job that might be interesting to you someday.  Craigslist is an easy, free resource for finding jobs - but even better is BAVC's very own jobs forum.  Once you find a job, look it over and make sure it seems like a good fit for you (or future you).  Go ahead and write up a cover letter and resume tailored to that job, and email it to me before class on Wednesday for us to review.

Okay?  Okay.  Great.

On with the SKILLZ to get you those JOBZ:

Today we're going to continue our work with the video cameras.  We're going to learn some basic terms and shot types, and we're going to be looking at various ideas around image composition, camera placement, and camera movement.  We'll learn the common tricks used to set up some basic scenes - but the most important thing is that you continue to stick with what you like and define your own style. Movies get boring if we all do the exact same thing all the time - so think about when you might want to use these techniques and when you might not.

Some of this is stuff we've already talked about in theory, but now we're going to put it into practice.  Let's start by identifying the common shot types used in cinema.  It's important to know these basic ideas and terms so that you can start sharing in a common vocabulary with fellow artists.

Often when you're watching a movie or television show, a new scene starts with a wide shot.  Because this shot is also giving you the context for the new setting it is called an establishing shot (you know, because it establishes where you are):


Boom.  We know we're in San Francisco.

Other wide shots are used to emphasize location, scenery, time of day, etc:

A wide shot can also just refer to any shot that uses a wide-angle lens, or shows a lot of a scene (it doesn't always have to be so epic and far away).

When you introduce a subject, generally a person, the basic definition for shot types are pretty specific. A full shot is a type of wide shot that shows the entire subject (sometimes also called a long shot):
They aren't usually flying.  But sometimes.

A medium, or medium-wide shows the subject from about the waist up to the top of the head:

A medium close up is from about the collarbone to the top of the head:

A close up is just a bit tighter, emphasizing the face:

And an extreme close up emphasizes a very particular feature - flash of the eyes or a speaking mouth, for example:

Here's a nifty view of all of these shots cropped from a wide, for comparison:
Notice the use of abbreviation - these are common in creating shot lists or referencing shots on paper.

What else do you notice that's similar about all of the shots featuring a human subject?  In general, you don't want to give them too much head room unless you're doing so for a specific reason.  It can look a little bit awkward and make the subject appear small in the scene - this can be a really good thing if you want that - but if you're just looking to convey a normal moment it can be distracting:


When you have multiple subjects in a scene, you have to think about how you want to shoot them - what is their dynamic?  What is the feel of the scene?  Here are some common shots:

The two shot:

Usually just refers to a shot in which two characters are in the scene without any specific emphasis on one or the other.

Over the shoulder:

Over the shoulder is super common in dialogue scenes between two characters - it's great for giving the scene a little more depth and is also convenient in editing audio.  One subject is emphasized (usually in about close up range) while the other is just slightly in frame and their face is mostly obscured.  Typically you would also use what is called a 'reverse shot,' which is simply over-the-shoulder of the other character.

Those are the basics - but obviously there are a lot of other factors that can start to change the look of these.  The beauty of cinema is that we can decide and control so many variables with the camera.  One major thing to consider is the camera placement and angle.  You don't always have to shoot things from straight on, right?


A shot from the side like this is called a profile shot - not like a facebook profile though.

There are low angle shots:

and high angle shots:


Which don't necessarily have to place the camera really high up or low down, but have more to do with the way you point the camera.

There are an endless number of ways to position your camera for any given set up, emotion, and scene. Some other things to consider when deciding on your shot composition:

The rule of thirds - the rule of thirds is an aesthetic idea that things placed squarely in the middle of a frame are not as dynamic or compelling as things placed along another line.  To follow the rule of thirds, you simply think of your frame as being split into a grid like this:

If your subject falls within one of the grid lines, or ideally along the intersection of grid lines, then according to the rule of thirds idea, it should draw your viewers attention more effectively.

This is in line with thinking of ideas of symmetry and asymmetry.  Just because a subject is centered does not necessarily mean it will be less compelling - some artists and photographers love using a centered subject:
In this particular example, the photographer also achieves a lot of symmetry and a very balanced shot.  things on the right half closely mirror things on the left, as opposed to something like this:
Either one could be very compelling for a specific purpose.

Also consider your use of space - do you want to fill the frame with activity and visuals?


or keep some of it spare?

Remember, everything that you put in a frame is building what is called Mise En Scene.

Of course, a huge advantage of cinema - one that hasn't been addressed yet today, is the idea of camera movement.  This can come in so many forms, as we've discussed before there are many tools to achieve it.  But some very basic ones that you see all the time and only require a very simple tripod to pull off include:

Panning - movement of the camera from side to side, notice it in the transitions between these scenes from Some Like it Hot:

Or the famous opening shot from Psycho (2 minutes in):


and Tilting - movement of the camera angle up and down:


And of course, beautiful things can also be achieved with a stationary camera that allows movement to occur only within the frame - below is a series of clips from Days of Heaven, a beautifully shot film that employs many of these different types of shots and movement (Academy Award winner for best cinematography):

The possibilities of camera angles, composition, and movement are as endless as the subjects you try to capture.